BeSo chic. BeSo organic. BeSo YOU. ...thoughts on design, fresh interiors + style from a photo stylist.
Showing posts with label Art. Show all posts

Friday, June 28, 2019

sun prints : diy


Summertime is my personal fav time of year, so I decided it was time to re-cap one of my most popular all-time DIY projects, just in time for the summer SUN. 


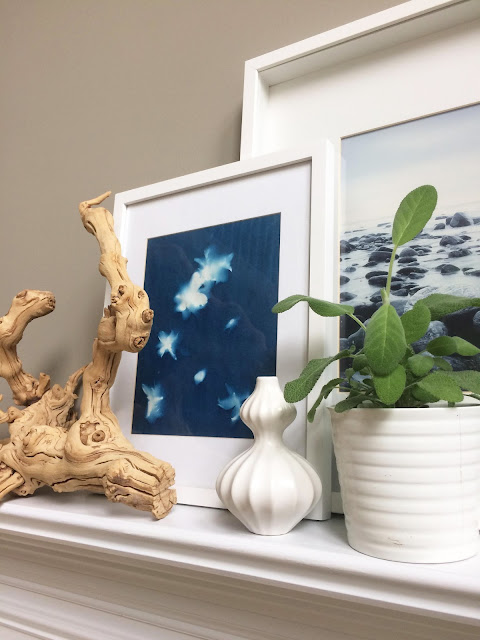
The sunprints I made several years ago have decorated photo sets, furniture showrooms, and of course several different rooms + corners of my home. They are a fun craft to do with kids (of any age). It's like magic.

Here's the step-by-step HOW-TO:

Step 1 – Gather the items you need

Sun Print paper (I got mine from here)

- An acrylic sheet (the Amazon sunprints come with one in the package)
- Cardboard or paper towel
- A tub of cool water (the kitchen sink will do)
- Interesting shapes + objects from nature (branches, shells, etc)

Step 2 – Arrange nature elements on a piece of sun paper out of the sunlight.

For best results, arrange your objects on the paper in a dark space indoors (I used a pantry closet).Direct sunlight causes quick exposure of the paper, so you want your elements arranged before you bring it outside.

Step 3 – Place an acrylic sheet (ie: plexiglass) on top to flatten and hold your items in place on the paper.
Once your items are placed on the paper, cover them with an acrylic sheet to keep them secure as you Use an acrylic sheet when making prints of flat or almost-flat objects to help sharpen the edges between blue and white in your print. Ambient sunlight outdoors will find its way underneath the edges of your objects if they are not pressed firmly to the paper, and you will get sun prints with blended contrasts.
Step 4 – Take your sun print composition outside and place it in direct sunlight for 2-5 minutes.
The areas of the paper exposed to the sun will fade from blue to white. When you see most of the color disappear from the paper, your print has been fully exposed. If no direct sunlight is available, don’t worry – just expose your print a little longer and wait for the same fading effect. Under cloud cover, the process will take 5-20 minutes depending on the thickness of the clouds.
Step 5 – Rinse your paper in cool water. Watch the white turn into blue and the blue turn into white.
It’s magical! To get the deepest blue, leave the paper in the water for a while: 1-5 minutes. 
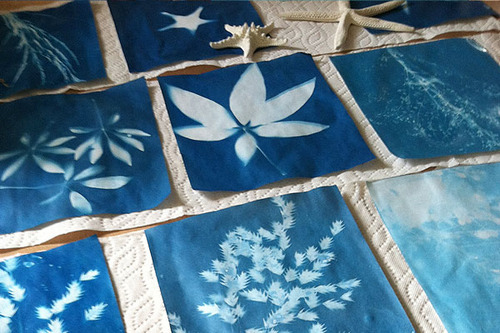
Young America DIY Sun Prints
Step 6 – Lay your sun print flatly on paper towel or cardboard and allow it to dry.
Putting it on something absorbent will help to avoid the formation of water spots by drawing the water away from the sun print paper. By the time the water has dried, you will have a vibrant blue sun print! 


It's the perfect DIY craft project for Summer. 
Read more of the how-to here

I hope you're enjoying the season! Comment below + share your favorite summer pastime.

xo

patti


Tuesday, December 3, 2013

secrets from a stylist: MIX IT UP!

Hi all!

Today, I'm handing it off to a special guest blogger...my twin sister Pam Stasney.  She too is a photo stylist {+ set decorator}.  She has designed sets for film, television + more...in NYC + LA...and has currently landed in Milwaukee. She was recently featured in the December issue of M Magazine: Milwaukee's Lifestyle Magazine {click here to read the full article.}


Take a peek at some of her interior spaces + listen to her insights into interior styling + design.  Here she is...


{Pam Stasney, as seen in M Magazine December 2013.  Photographer: Dan Bishop. Sources: Sofa from Architexture Home (Studio City, CA),Baker Chair designed by Barbara Barry and found on Craigslist, Sunburst Mirror from Plantation Home Los Angeles, Throw pillows from OneKingsLane, allmodern, etsy and Target. Area rug designed by Dwell and available at McNabb & Risley.  Turquoise Lamps from Target, White Ceramic Pagoda from Design Xchange, Pewaukee, WI.}


With years of experience decorating sets for film and styling photographs in New York, Los Angeles, Chicago and now Milwaukee, I have learned a few trade secrets that I'd love to share with BeSoStyle readers.


First and foremost. It's all about mixing it up!


Mix High + Low


Ok, I admit, I have expensive taste, far beyond my budget.  I've learned that if you splurge on one or two statement pieces, you can supplement with bargain finds, without sacrificing style. 


In my office, I have a high-end, antique desk from a movie set I decorated (one of the perks of working in the film industry). 


{Pam Stasney Style Office.  Photographer: Dan Bishop.
As seen in M Magazine, December 2013.}
...but, my desk chair is a bargain find from Marshalls, designed by Cynthia Rowley.  Ikat pillow from OneKingsLane (an amazing resource).  And the stunning brass étagère is a second-hand find from Designer Consigner in Hartland, WI.

Another great way to MIX IT UP...


Mix Old + New

When I’m creating a lifestyle set, whether for photography or film, my goal is to create a space that feels collected over time.  Mixing vintage pieces with more modern elements makes the movie magic happen.  In my office, I created a gallery wall over my desk, a chic way to display a collection of art.  In the gallery, I have some cherished heirloom pieces:  an abstract painting from my Dad (Dancing Rainbow) and a small watercolor painted by my mother-in-law.  Alongside these heirloom pieces, is a mixture of contemporary art creations: a fine art print from my husband (Butterfly Peonia by Jeff Stasney), a graphic Golden Retriever Silhouette from Mod Dog/etsy.com, Fruit of the Spirit Print from Olive Manna, Spin Art from a friend (I just love kid’s art) and a DIY project I created on a whim.


Mixing old with new works when styling your bookshelves too.  Intermingle interesting objects alongside your books to keep it visually intriguing.


{Pam Stasney Style Office, Etagere Detail.  Photographer: Dan Bishop}

Mix Neutrals + Patterns


A neutral base is timeless and opens the way for color flexibility.  For my interior design clients, I usually recommend neutral colors and great textured fabric for the cornerstone pieces of a room. My sofa is a deep neutral grey.  Because I’m a California girl (at heart), my color accents are primarily the colors of sun and surf.  It’s what makes me happy.  With a neutral base, you are free to change up your throw pillows with colors and patterns to suit your mood-of-the-moment.  Simply changing the accessories can create a whole new feeling in your space, without having to spend a lot.


Before you begin your design project…

Create a Mood Board for Inspiration.


Here's mine for my office space...


Creating a mood board is definitely something I’ve learned from my work in film and photo styling.  Whenever I am creating a space or story, I first gather inspirations: fabric & wallpaper swatches, paint chips, objects of nature, interior or fashion photos that have a certain vibe, a piece of art, an architectural element etc…As you gather, see how it flows.  You will be able to edit and refine as you narrow down the feeling you want to create. 


When it comes to your personal space, surround yourself with colors and things that make you happy.

pam


Thursday, September 12, 2013

coral crush + etsy love

So...I have big news!
My sister (twin) in real life and in styling just opened up a little etsy shop of her very own. 

As you may have gathered from previous posts, I am a huge fan of etsy, and often use it as a resource for styling gigs. I adore the handmade, unique quality of etsy finds.


My sister Pam {pamstasneystyle} is an experienced set decorator + stylist and has curated quite the collection of beautiful, artful items. Style Studios showcases props she's used on film sets and discovered on her travels + prop-shopping adventures.


Feel free to re-pin my pin which links directly to her shop...or just go straight there...


Seriously, check it out. There are some amazing finds at Style Studios. Use coupon code BESOFRIEND to get $5 off your purchase through the weekend.

In addition to announcing the new shop, I also wanted to share a few images of inspiration. My current colour crush is coral, that delicious mix of pink + orange. So fresh + inviting. Take a peek at some of these inspiring hints of coral-from blush to bold...

{image via ingerstedt-elle deco Sweden}
{image via crushculdesac}
{image via slimpaley. artist tina steele lindsey.}


{image via biicok}


{image via harpersbazaar}


{image via visual optimism-elle denmark}


You may also enjoy these coral-inspired posts from the past: ombre obsession, garden party dreams and sunsets + style.

Life is complicated.  Enjoy the beautiful moments in-between the chaos.

xo

patti


Friday, May 17, 2013

peonies + inspiration

Hi again. 

I wanted to share a few bits from my week and mostly just wish you an amazing weekend!


This past Sunday was Mother's Day and I had a few treats, which included beautiful peonies,


a gift of a MAC makeover + makeup (it's like being a kid in a candy store),


...this is MAC's new Baking Beauties Spring/Summer 2013 Collection...so fresh + fun!...

...& a delicious dinner prepared by my very talented + Italian husband, including prosciutto e melone. He wrapped sliced cantaloupe with thinly-sliced prosciutto - Italian ham and then drizzled with balsamic + olive oil, salt + pepper. Such a yummy treat. Here's an instasnap...


...and finally watching my girls jump on the trampoline on a beautiful evening.  Those picture-perfect moments are ones to savor.


During the week when I wasn't transporting or negotiating with my teens, I was working (Post & Gray has their big patiopalooza event this weekend. If you're in Charlotte don't miss it!)...and I managed to do a little playing (checking-out my fave blogs).  I found this gorgeous inspiration at alisaburke...


Click here for more inspiring + beautiful images of her Spring colour study.


I wandered over to peoniesandbrass (love her blog + style).


...and found this breath-taking interior via northern light + lonny...


Don't you just want to be there?


Wishing you an inspiring + beautiful weekend!!!


xo


patti

Friday, April 19, 2013

C-O-L-O-U-R!

Hi all! I'm guest blogging today over at Young America. We just completed the design installation of their new Showroom in High Point.

I developed many DIY ideas and together with the YA design team helped bring the concept to completion. Visit the YA blog for DIY details. Here's a close-up shot of the color block or "paint box" room...


 ...and the room complete...

The original inspiration was from this amazingness from Emmanuelle Moureaux architecture + design...

{image via blackeiffel}

...So while I'm on the subject of color blocking and COLOUR...here are a few recent finds of inspiration...


Beautiful photography by Kate Mathis.
Doesn't it just make you want to create something?


{image via mietteshoppe}

Gorgeous architecture + lighting in #Paris. LOVE!


{image via street-fashion}

FUN fashion + colour!

Wishing you a colorful weekend!!


xo


patti

Friday, February 1, 2013

valentine diy: crayons + watercolors


I was so inspired recently when I stumbled upon this amazing blog.


I had this image pinned to my Art pinboard for quite awhile, but I finally got around to clicking over.  And, wow! I was so glad I did. Absolute inspiration!


Once I soaked in the beautiful color + texture of Alisa Burke's post "creativity-with-crayons" ...I couldn't resist. I had to PLAY. (Click over and take a peek. I promise you'll be inspired too.)


I have had a long-standing love for crayons + watercolors. There is something about opening up a big box of crayolas or a palette of paints.  It must be the vast array of COLOR + all the possibilities of CREATING.

I put a little VALENTINE SPIN on Alisa's crayon + watercolor idea. As you know, I've been all about pink + red lately. 

SO, here it is, my Valentine art creation...


All you need is a white crayon, watercolor paper, water, paint + a brush. It's kind of magical really. It's a fun one to do with the kids (I think I'll keep all the art supplies out...even my teens might go for it.)


...And while I had the crayons out, I decided to create some Valentine CRAYON HEARTS (some of my favorite things from childhood).

You just need a few ingredients: crayon shavings, wax paper and some ribbons.. plus an iron to melt the shavings within the wax paper sheets.  Here's how my creation turned out...


I ended up ironing the wax paper a bit more to further melt the crayons...


Though I did it all from memory, there is a great how-to here

{image via pinterest}

I hope you've had a great week.  And I hope this post brings out some good memories... and maybe even a box of crayons. :)


Happy Friday!


xo


patti


Wednesday, January 23, 2013

discovering your cinema self

As with most creatives, I have started and stopped and re-started a few books to inspire creativity.  One book I've attempted several times over the past several years is The Artist's Way by Julia Cameron.  It is full of ideas for sparking creativity ... for finding your inner artist. 

One idea, "morning pages," suggests journaling 3 pages every morning. Free-form writing to vent all the burdens and angst "blocking" your creativity ...in order to free your mind and ultimately your artist soul.  

{image via emmacassi}

Another idea I love from the book & try to do (though not as often as I should) is the concept of an "Artist date." A 2-hour or solid chunk of time devoted to you & your creativity. Doing something inspiring.  Seeing, touching, feeling, listening to creativity that will light the fire of imagination + invention. Visiting a museum, seeing a dance performance, going to an art store or a groovy little cafe, painting, playing, being in nature ... finding the artist within.

When I lived in Minneapolis (I know it's hard to imagine this Florida girl in the great white North, but it's true), I had the privilege of attending a seminar by Julia Cameron.

One of the exercises she had us do was extremely fun and memorable for me. So memorable in fact, that I often use it as a reference point when evaluating and re-assessing life.  Here's a very rough breakdown (from memory only, I didn't even google it).  


The concept of the exercise is imagining your Cinema Self.

Julia had us envision our lives as a movie. To picture ourselves on film. 

What would your life look like? Picture your dream self, your "Cinema Self."  Who are you?


- Where do you live?

- What do you wear?
- Where is your favorite place in your home?
- Which celebrity is cast to play "you?"
- What does your spiritual life look like?
- How about your exercise ritual?
- And, your philanthropic efforts?
- Where do you travel?
- What kind of car do you drive?

I know, you might think it could be a depressing exercise. I mean we all want an awful lot of things we don't have. The interesting thing to me was that it actually had me thinking "Why doesn't my life look more like this?" I mean a lot of these things are in our control. Whether we choose to exercise on a regular basis (or not, guilty). How often we involve ourselves with charitable giving. Being spiritual.


So, take a few moments and think through your answers to the questions...and figure out who your Cinema Self is... and decide to become more like her (or him).  Make a different decision or two or three this week, this month, this year.


Of course, being the visual person that I am, I thought it would be fun to visualize my Cinema Self, so here's one more collage. See my recent craze with collages here...


#CinemaSelf ... inspired by Julia Cameron
{My Cinema Self}

Obviously, My Cinema Self lives in jeans, flip-flops + white tees; lounges in layers of furry coziness; spends many hours + vacays at the beach; is an in-shape yoga-loving girl; and travels to places with lots of twinkle lights. A girl can dream, right?

But on a deeper side, doing this Cinema Self exercise again has me realizing, I really want to figure out a way to use my skill set and give back in a more profound way. I would love to get involved in something similar to Extreme Home Makeover, just maybe not-so-extreme. I'm on the look-out for opportunities. Anyone know of any such event in North Carolina?


In 2012 I was able to participate in a Habitat for Humanity ReStore ReStyle Design Challenge fundraising event. (If you want to apply to participate this year, see here.)  I really hope to find some deep + meaningful ways to make a difference this year.


...Let me know what you think of this exercise to define your Cinema Self... Did it enlighten you at all? I love hearing from you.


xo


patti